


First light with the EAGLE CORE; I finally had a chance to get it out for a proper test under the stars, and this is what happened.
After months of life, work, interruptions, and weather, I got my proverbial s%*t together and was able to give our new EAGLE CORE control unit for DSLR astrophotography a proper go, and lemme tell you, did it go. Note that this kind of AP is usually not my style. I’m a control freak with AP, I want to tweak EVERYTHING, ALL THE TIME. It’s like switching from Android to an iPhone — without a computer, you don’t have as much control, but in the end you don’t seem to need it. It’s actually very refreshing once I got over myself…
Click here to read my first impressions article about the EAGLE CORE, complete with an unboxing video. What more could you ask for?
DISCLAIMER: PrimaLuceLab provided me with an EAGLE CORE and their autoguider package to use, after some due diligence and research, I decided to give it a go.
Gear check

- PrimaLuceLab EAGLE CORE control unit for astrophotography
- Imaging camera: Canon 60Da DSLR
- Autoguiding with the PrimeLuceLab autoguider package:
- Mount and tripod: Celestron AdvancedVX
- Imaging Telescope: Officina Stellare Hiper APO 105 triplet refractor and field flattener
- My handy DIY 12V battery pack
- My old Nexus 7 Android tablet for acquisition and guiding interface over WiFi (yes, it’s over 4 years old as of this article)
- No computer
- Shorts and flippy floppies (this is Africa)
- Steph, the astrodog, until she left me for sleep
Starting up the EAGLE CORE
To get things going, all you do is power on the EAGLE CORE, which is just plugging it into a 12V power source like any good piece of AP kit. There is no power button — if it has power, it is on. Just plug it in using the included automotive power connector and beefy AF power cable. There are also three extra 12V power outputs that you can use for things like your imaging camera, mount power, etc., to add even more simplification. You just need the extra cables for them (which I don’t have, but would be awesome).

Then using any WiFi enabled device, like a smartphone, tablet, iPad (same thing, duh), Windows/Mac/Linux computer, Chromebook, etc., connect to the EAGLE CORE’s WiFi access point and point your device’s web browser to the URL (IP address: http://192.168.4.1) where the EAGLE CORE’s “EAGLE APP” is running on the device. It’s just a simple progressive web app, so it’s multi-platform by default. My old Nexus 7 Android tablet was a great device to use with it. I even put a handy shortcut icon on the home screen (remember, I’m lazy).

Once the EAGLE APP is up and going, there are two main screen tabs, one for autoguiding control and monitoring (including a live-view of the guide camera view) and one tab for image acquisition.

One of the very cool things about this is that you don’t always need to be in contact with it. You can leave and come back, and reconnect to the app at any time and you’ll find it was happily running and doing its thing while you were gone. But, I’m not gonna lie, the best thing about this is that you can leave it outside and go watch TV/process data/nap/drink beer/take selfies/etc., all while monitoring and controlling things remotely, as long as you’re within the EAGLE CORE’s strong WiFi signal — and you don’t have to leave a computer outside running things. Bonus.
EAGLE CORE camera control: works well, almost too easy
The EAGLE CORE supports quite a few cameras, which is kinda the point, so that makes sense. I’ve personally used it with my Canon 550D, Canon 5D Mark III, and Canon 60Da, all worked fine. Images are saved to the camera’s media card. Without a computer, what more can you expect? So, use a good, trusted media card. I use Lexar media like this, for the moment. Simply plug your camera into any of the many USB ports available on the EAGLE CORE, and it works. That’s about it.

TIP: If you switch your camera between bulb and manual modes, you just need to go to the menu (the three bars, upper left), and select “Camera Settings” for the app to re-initialize with the new mode.
Focusing
One of the features the EAGLE APP has is running an automatic focus loop. That means it will take exposures and display them one after another to allow you to adjust focus in between.
Set your camera to manual mode, and set a short exposure length, about 5 seconds or so, and jack the ISO really high, I used ISO 6400, or as high as you can go. Then press “Start focus loop”. As exposures come in, they will be displayed below. The way the user interface works is that you can zoom in to get the full resolution during this mode. For me, this meant pinch zoom, and watch as I change and adjust focus. Easy.
Why not use Live View mode to focus? Well, in my experience, Live View is easier. But, also, I’ve learned that Live View can be a trap (…it’s a trap!), and it is not as accurate as using a longer exposure (like 5-10 seconds or so) to focus on smaller and dimmer stars. Even when I shoot wide-field Milky Way photos, I only use Live View to get close. I always use a proper exposure to make sure focus is dead on. So, using a focus exposure loop is more accurate.
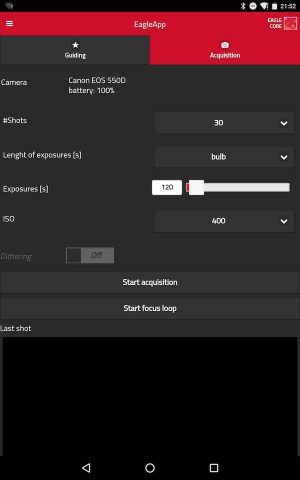
Acquisition
Once you are focused and happy, simply stop the focus loop, change your camera to bulb mode (which remember may require you re-initialize the app in the “Camera Settings” menu). Select the desired exposure length in seconds, the ISO setting, and the number of shots you want to take. Then press “Start acquisition”. As with the focus loop, the exposures will display on the bottom of the screen as they come in for you to monitor.
The EAGLE CORE will soon support dithering during acquisition via their simple firmware upgrade process, switchable with a super-simple-to-use on/off button on the acquisition screen. Dithering is just a darn good idea, and it will be one button press. I haven’t used dithering much, but I should. And will.
What is dithering? Simply put, it allows for small movements between exposures so the same parts of the image aren’t on the same exact pixels all the time, and can help with things like noise, hot pixels, etc. It’ll be just a little one-click method to make your images a little bit better. I can’t wait for this feature. I like one-click improvements.
Autoguiding: spot on, effortless, automatic
I could make this part super short — the EAGLE CORE put the “automatic” in autoguiding. Seriously, I didn’t touch a thing. I played newb astrophotographer and just told it to go. Here are the steps to success. I didn’t do anything fancy like change the math in the guide settings or anything. Everything was left at the default settings.
- Plug in USB cable on guide camera to EAGLE CORE, and the ST4 guide cable from the guide camera to your mount.
- Center and focus your target in the imaging camera’s field of view (it’s just easier to get this done first).
- Push the calibrate button and let it do its thing for a minute or two.
- Push the “start guiding” button.
- Start your acquisition session!
My apologies to the heavily used PHD2 (Push Here Dummy) autoguiding software, but this was easier, so even dumber dummies could use the EAGLE CORE, I think. I’m honestly thinking about using it even when I do CCD imaging, just for the autoguiding.
Autoguider calibration
The hardest thing about calibration is finding focus with the guide camera. That’s a given with any guide camera setup, and happily the PrimaLuceLab guide scope has really good dual (coarse and fine) focus control, both. Luckily you only have to do this once. That’s not really about calibration though, is it. Ok, for calibration of the guide system, all I had to do after I’d focused and centered the imaging camera on my target, was just press “Calibration,” and wait a couple of minutes. I didn’t touch the default settings. It was boring. It just worked. *sigh*

Note: Remember if you change targets, it’s best to calibrate the guiding again!
Now we’re ready for autoguiding…
Once the calibration has completed, you can “Start guiding”. Like any autoguiding system, it takes a minute or two for things to settle down after you start guiding. Note the wonky graph at the beginning:

Once things were going, this is how the guiding graph looked, the entire time I was imaging (below). If you’re not familiar with autoguiding graphs here’s a tip: this is good, this is what you are looking for. You want the Delta RA (orange, change in right ascension) and Delta DEC (blue, change in declination) guiding lines to hover around the center line the whole time. That means things are going well and only small adjustments are needed by the system to keep the telescope on target enough for you to have nice round stars.

Dithering
As I mentioned above, during acquisition the EAGLE CORE will allow you to enable dithering via a firmware update that will be out soon. Luckily the autoguiding and acquisition are bundled together in one app so there isn’t any issue trying to connect the two components together. The autoguiding system needs to know when the exposures are completed so dithering can happen in between shots.
My target for the night: Omega Centauri
Because my main goal was to test the EAGLE CORE and see what it is made of for real astrophotography, I picked an easy target for the city lights: Omega Centauri, the largest globular cluster in the sky. It’s really big, like huge. Big enough to be a good target even in a ~650mm focal length scope. Also, it has an estimated 10 MILLION STARS in it and a mass of 4 MILLION SOLAR MASSES. Take that, M13! OC wins, sorry not sorry.

Where was I? Oh yeah, my target for the night. So, below is a single raw light frame (sub) of Omega Centauri, full size straight off the camera. This is 180 seconds at ISO 400, the best I can do in the city without blowing it all out.

And here is a tighter crop of the cluster showing nice, round stars. I’m happy with the guiding system, my success rate for exposures was very high!

I’m lazy, I didn’t even shoot darks (but I should have, and it would have been easy). I also didn’t shoot flats (but here’s how I could have done it). Did I mention I’m lazy?
A quick post-process of Omega Centauri
Anyway, what I DID do is go through all the subs, which wasn’t a lot, only 24×180 seconds, and threw out the not-perfect ones. I had to quit early because the rising moon was starting to ruin my exposures and Omega Centauri was too close to zenith (straight up…) for the mount to track accurately, which is normal. I should note that ALL the not-perfect exposures were at the end of the session, when the target was near zenith. So that means the tracking and autoguiding was working brilliantly until the loaded mount couldn’t cope anymore.
After I narrowed it down to 18×180 seconds of data, 54 minutes total, I fired up my trusty old friend PixInsight to integrate and process the data into what you see below. Note I only spent about 30 minutes on this, so while it’s not perfect, I think it turned out pretty nice!

Download my raw data of Omega Centauri and process it yourself!
The rules are few:
- Tag and link to PhotographingSpace.com if/when you post on social media!
- Comment here with a link to your processed image so I can see it!
Click here to download the raw files!
To sum things up: I really like using the EAGLE CORE for my DSLR imaging

There is a lot to cover with this simple-yet-powerful device. I think it does a great job keeping things simple on the front end, yet allowing you to tweak a bit if you really want to. I’m going to keep using for DSLR work, it’s proved itself way too handy to put aside. And, the autoguiding was so spot on and easy to use that I’ll likely even use it for guiding when I shoot with the CCD.
Firmware updates are released often, and they are wicked-easy to install. You just use the same mobile device you control it with. For example, I used my Nexus 7 tablet to update the firmware just before my imaging session. I just downloaded the small file from their website, put it on my tablet, and pointed the EAGLE APP where the file was. It rebooted after a few seconds, and there you have it, Viola!, Bob’s your uncle, all that.
What would I change or add?
As of the December 2017 firmware, there are only a few things I might suggest they add to future versions:
- Histogram display for captured images during acquisition.
- Temperature data of the camera sensor (so I can take note and shoot darks later).
- Option of a rotatable fine grid overlay on the guide camera FOV. This would make it even easier to use for drift alignment!
- Dithering support (which I’m told is coming via a firmware update soon)
- It would be cool if it would fetch me a beer while I wait for data to come in.
Have questions? Ask away in the comments below!


Hi Cory! Did my homework.
You’ll see it here : https://www.flickr.com/photos/mathieudelamoriniere/41482483571/in/datetaken-public/ .
Tried my best and I don’ have PixIn! Used SIRIL(free very efficient software).
I’ll take any comment, tips, advices on my version ^^
I chose not to crop as much as you did to keep the little galaxy on the right in the FOV.
I would say that a few lower exposures would have helped(me) to get the core better and some darks at least would have helped for the background. I wish you would share a full res version of your treatment to compare!
Thanks for sharing
Mathieu
Awesome work, Mathieu! Thanks so much for sharing. Great catch on the galaxy!
I’ll post my final version on Flickr where it will be full-res. Maybe also on Astrobin.
You should be able to carefully process the core, as it was not blown out in the exposures. Sometimes it’s an exercise in very careful histogram stretching and curves manipulation. You may be able to lesson the amount of contrast to get more star color and not blow out the core. Remember, space is usually not “black”!
All the best,
Cory
Re: Dithering. Dithered movements of the mount have to be applied between exposures of the imaging camera, which a guidance app has no knowledge of. So there is typically an API that allows the acquisition software to tell the guidance software when and how to apply the dither movements to the mount.
Hi Kevin,
Doh. Correct! I worded that wrong and will update the article. Thanks for pointing it out!
Cheers,
Cory
I’m so interested in something like this. (I’ve looked at other stand-alone autoguiders, but they’re all 10 years old!) My problem is I’m lost as far as what I need beyond the EagleCore unit to add autoguiding to my C8. I also can’t tell if the EagleCore needs the PrimaLuce camera and guidescope, or if any combination will do. So my ignorance is leading to inaction. Let your buddies at PrimaLuce know that this is a sticking point.
Actually, I’m now working with their distributor in the US (Telescopes.net / woodland hills) to put together a package. So feel free to delete that prior comment!
Hi Chris,
Happy you’re getting sorted out! But I’ll leave the comments there!
I would definitely recommend the PrimaLuceLab guiding package, though. The EAGLE CORE doesn’t NEED it, as it’s currently compatible with a couple other guide cameras, but it is a very nice package. AND, you can use the guide scope for an awesome planetary/lunar imaging camera. Double the duty!
Cheers,
Cory
Great article, great website I am just discovering.
Quick one: any idea where I could find an OS 1005 or 115? Seems like they have discontinued a while ago, I cannot seem to find any available anywhere?
Hi Paul,
I’m not sure! Our APO 105 was purchased more than 5 years ago, direct from OS. Secondhand would be your only option, I’m sure. Other than contacting the folks at OS directly. A quick google search shows a few results for the Hiper APO 115 refractors available online…
Good luck, and let me know if you find what you are looking for!
Cheers,
Cory
No chance but it seems like BORG is coming out now with fast refractors that look very tempting. One more question if I may about Eagle Core: can you configure it to take bias and darks as well, or you need to do it “manually”?
Hi Paul,
No problem! There is no configuration specifically for bias/dark/flats, but all the camera controls are there, so you could easily configure the EAGLE CORE to shoot calibration frames with whatever camera settings you please. It would be no more “manual” than shooting lights. 🙂
Hope that helps!
Cheers,
Cory
Hi there,
I think I’m a bit late to the comments but maybe you can help….I’m this close (holds up finger and thumb) to getting an Eagle core but the one thing that I see missing from all of the review is if you have to change your polar alignment routine. At the moment I use a PC with Sharpcap and use the polar alignment tool there….so still using a PC in that respect.
Will there be anything similar in the Eagle Core?
Hope I’ve not missed something obvious.
Many thanks for your input
Hi Terry,
I’m working on a tutorial for just that, actually! There is currently no polar alignment software routine in the Eagle Core software, but there is a way to do it, it’s just hidden, if you know how. 😉
What I do, and have done for a while now, is a drift align. BUT — I’ve got a way to drift align *easily* using ANY camera and ANY EQ mount. The way I do it with the EAGLE CORE is by using the guide camera view, and it’s quite easy. So, I’m hoping to have that tutorial available soon.
All the best, and clear skies!
-Cory
Hi Cory,
Probably a daft question, can the unit manage two Canon camera’s independently ?
Steve
ps great review
Hi Steve,
There’s no such thing as a dumb question. 🙂
And no, it cannot control two imaging cameras at the same time. As far as I can tell, it can control one imaging camera and one guide camera. It would be a great addition to the firmware if it could, though!
Thanks for the comments, and all the best.
Cheers,
Cory